Adding a bathroom to your basement is one of the most valuable upgrades you can make to your home. Homeowners across New Jersey are increasingly investing in basement-level renovations, especially those that include bathroom additions. However, before jumping into the project, it’s essential to understand the basement bathroom installation cost and what factors influence the final price.
Why Consider a Basement Bathroom Addition?
Firstly, a basement bathroom significantly increases your home’s functionality and value. If you’re using the basement as a guest room, home office, or entertainment space, having a nearby bathroom improves convenience. Furthermore, a finished basement with a bathroom can attract potential buyers if you ever decide to sell your home.
Average Basement Bathroom Installation Cost
On average, the basement bathroom installation cost in New Jersey ranges from $12,000 to $30,000. The final price depends on several factors such as size, plumbing accessibility, materials used, and customizations. While this might seem like a substantial investment, the long-term benefits typically outweigh the upfront cost.
Cost Breakdown
-
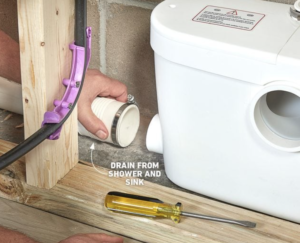
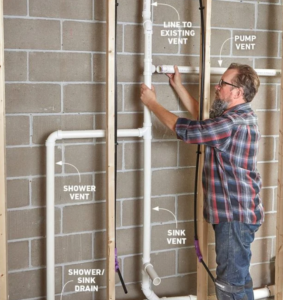
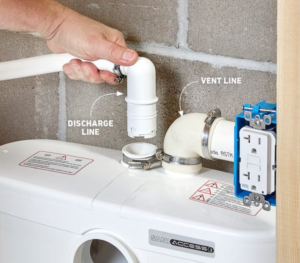
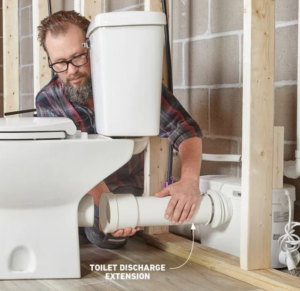
Plumbing: Installing new plumbing lines can be complex in a basement, especially if the main sewer line is above floor level. This might require a sewage ejector system, which adds to the cost.
-
Fixtures and Finishes: The choice of toilet, sink, shower, and tile affects the budget. High-end finishes increase your expenses but also enhance visual appeal.
-
Permits and Inspections: Most municipalities, including those in New Jersey, require permits for bathroom additions. The cost of permits and mandatory inspections should be factored into the budget.
-
Labor: Hiring licensed professionals ensures quality work but comes at a premium. Always factor in labor costs for plumbers, electricians, and contractors.
All of these components contribute directly to the total basement bathroom installation cost, so it’s essential to evaluate each carefully before proceeding.
Planning Your Basement Bathroom Renovation
Before starting construction, a well-thought-out plan is crucial. Consider the layout of your basement and determine the most suitable location for the bathroom. For a comprehensive overview of the process, read our guide on Adding a Bathroom to a Basement: 5 Key Steps.. Ideally, place it near existing plumbing lines to reduce installation costs.
It’s also essential to waterproof the space, especially in New Jersey where basements are prone to moisture. Proper insulation and ventilation will prevent mold and maintain air quality. For tailored solutions, explore our basement waterproofing services in NJ to safeguard your space before you start. You may also need to raise the flooring to accommodate plumbing systems. These steps, while necessary, can influence the overall basement bathroom installation cost.
Choosing the Right Fixtures
From modern vanities to compact toilets and corner showers, fixture selection greatly affects both cost and space efficiency. Choose fixtures that complement the overall design of your basement while staying within your budget.
For smaller basements, opt for space-saving fixtures. Wall-mounted sinks, sliding shower doors, and recessed shelving can help you maximize every inch. Smart fixture choices can help control your basement bathroom installation cost without compromising on style or function.
Hiring a Professional Contractor
Though DIY options exist, hiring a professional ensures compliance with building codes and local regulations. An experienced contractor can also provide accurate estimates, which helps manage the basement bathroom installation cost effectively.
When selecting a contractor, check reviews, credentials, and past projects. Ideally, choose someone with experience in basement renovations specifically. A local New Jersey contractor will be familiar with state and municipal regulations. If you’re not sure how to begin your search, refer to our guide on HOW TO FIND SMALL BATHROOM REMODEL CONTRACTORS IN NJ for helpful tips and vetted recommendations.
If you’re unsure where to start, read our detailed guide on How To Quote Basement Bathroom Install. It offers insights on pricing strategies, contractor tips, and the hidden costs that can influence your overall basement bathroom installation cost. You may also benefit from Everything You Need to Know About Installing a Basement to better understand the full scope of work.
ROI and Long-Term Benefits
Investing in a basement bathroom can yield significant returns. Not only does it enhance daily living, but it also increases property value. Potential buyers often view a finished basement with a bathroom as a major plus. If you’re planning to expand your living space even further, check out our Home Additions & Renovations section for ideas that complement your basement upgrade.
Furthermore, you can use the renovated space for various purposes — from renting it out to hosting overnight guests. The functionality and versatility provided by a basement bathroom justify the upfront basement bathroom installation cost.
To learn more about expenses, explore our in-depth How Much Does It Cost To Add a Bathroom? (2025 Guide) and compare it with other renovation projects.
Common Challenges to Anticipate
Adding a bathroom in the basement isn’t without hurdles. You might face issues related to drainage, ventilation, or even ceiling height restrictions. Fortunately, these challenges are manageable with proper planning and professional help.
Make sure you conduct a thorough inspection before starting the project. Identifying issues early will save time and money down the road. While these challenges may increase your basement bathroom installation cost, addressing them early ensures lasting results.
For design tips and planning resources, check out our expert article on WHAT IS THE BEST WAY TO REMODEL A HOME’S BATHROOM? to ensure your basement space aligns with both your budget and aesthetic goals.
Final Thoughts
Understanding the basement bathroom installation cost helps you plan effectively and avoid surprises. From plumbing and permits to fixtures and flooring, every element contributes to the final budget.
If you’re considering this renovation in New Jersey, consult with experienced professionals to get detailed estimates. With the right team and planning, your basement can become one of the most functional and attractive parts of your home.
Need more inspiration? Visit our Bathrooms page for project examples and renovation services in your area.

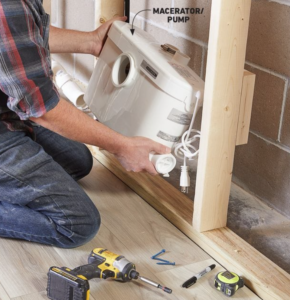
 STEP 1: Set the macerator/pump in place behind the wall framing. The unit would need to be at the same level as the toilet. Install the rubber feet and secure the pump to the floor.